1.31.2012

{Sewing Tip Tuesday} #1

Welcome!! I'm so excited to start a new series today!!


This tip is one of my own. It uses some of these....

And this is what I use them for...

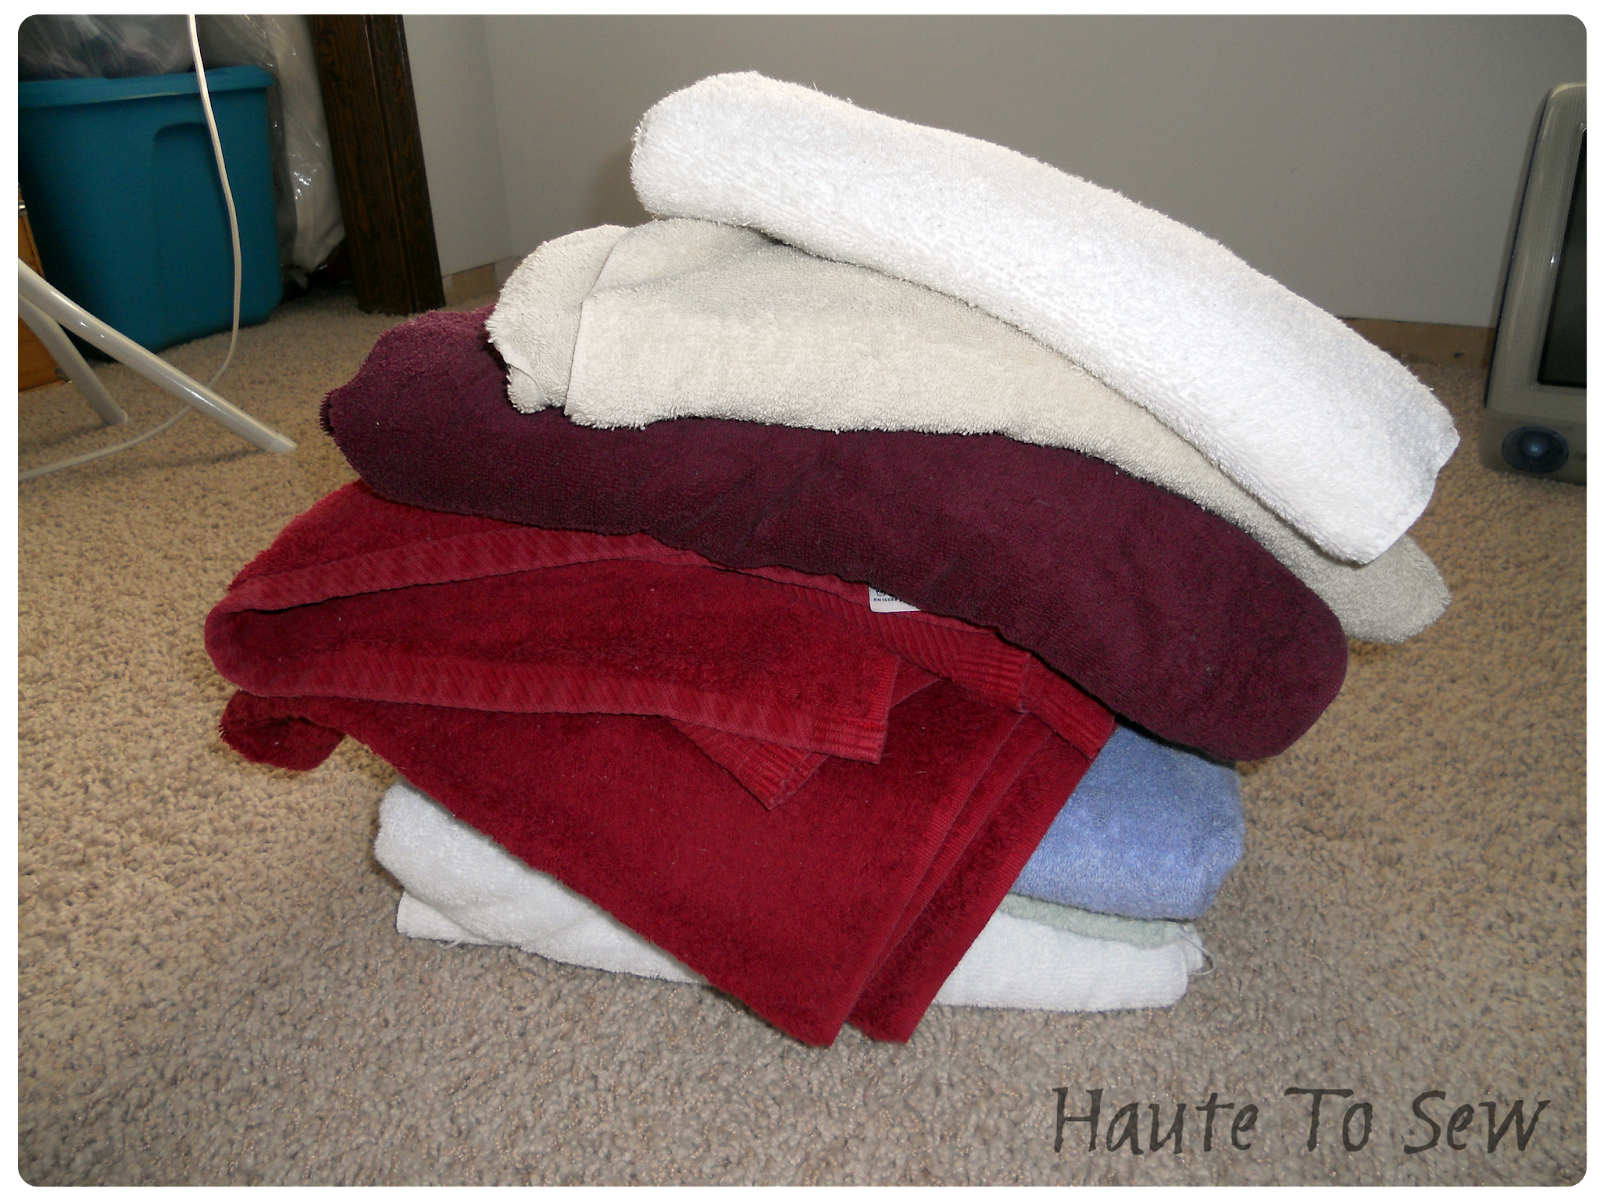
See how think all that fabric is?? How can you possibly put a pin through that?? Uh, the answer is, you can't. Back when I sewed my very first lanyard I sat in my sewing room looking for a better way to hold a thick section of fabric together, the pin just wasn't cuttin it. The light bulb went off when I saw a binder clip, hooray!

So now I do this all the time. Just clip them around your piece and remove them right before the fabric goes under your machine. They have enough strength to keep your fabrics from sliding around. Works like a charm!


I also did this when I made my Manly Tablet Cover. Try it out next time you have thicker fabric!

Another instance I just thought of that you might use this for is if you have a material you might not want to poke holes in. Like, in the pictures above, I wouldn't want to poke holes in that vinyl because, you know,  they aren't going to close up!

Not a bad tip huh? Go use it!


Signature

Pin It!

1.30.2012

Schedules

My name is Meredith and I'm an inconsistent blogger.

I might blog on Monday and then again on Friday, or another day, or not at all. I might not blog for 2 weeks at a time. Then there's the occasional week that I blog 5 times {gotta pat myself on the back for those weeks}! All of this inconsistency tends to upset me. It's in the back of my mind while I'm at work. It keeps me up at night. It leads to further procrastination and self-loathing. See, I have a problem. I don't like to start things I can't finish or have the potential to fail at. So if I don't have the time to complete an entire project that I want to blog about, then I won't start it. Then I have nothing to blog about. So sad.

In my attempt to become a better blogger for you, and for me, I am trying to come up with some sort of schedule that I can rely on each week. I don't have definitive plans yet, but I'm working on it. Hopefully you will see the changes, and consistencies, in the next few weeks. Woot!

First thing I'm going to start doing is a series called Sewing Tip Tuesday! Every week I will share a sewing tip that either I use in my sewing or one I've seen online that I want to share. I'm pretty excited about it! I've been writing down these tips I want to blog about and have enough that I thought a series would be a great way to share them with you! What do you think? Do you like the idea?

For those of you that have your own blog, how do you deal with being consistent?
Do you have a schedule?
Would you be interested in a linky party on here to get to know new people and blogs?
Any suggestions for you what you would like to see here?

Don't forget, tomorrow starts...


EEEEK! I'm so excited!

Signature

Pin It!

1.20.2012

{Noreply-comment} Bloggers

Are you a "noreply-comment" blogger??? If you don't know what that means, let me fill you in...When someone posts a comment on my page, I get an email notifying me of the comment. In the "From" box it shows your name and either your email address or "noreply-comment@blogger.com". I make every effort to reply to every single comment that I get. However, if your account is set to hide your email address, then I can't reply :(  <---see that sad face?? I would LOVE to reply to all your comments.

SO, if you want to change your settings {pretty please} so I can reply to your comments, do the following...

1. Go to your blogger dashboard
2. Click on Edit Profile
3. Check the little box that says Show My Email Address
4. Save your settings

Done and done! So easy. So won't you please change? I pinky promise I will talk to you!


Signature

Pin It!

1.19.2012

Bathroom Remodel

Seeing as how our house was built in the 70's, we have 2 of the ugliest bathrooms EVER! No joke, they make me want to barf. I'm going to apologize in advance, I don't have very good before pictures. This remodel was not planned and took over a year, working on it all bit by bit. The bulk of it was actually done before I even started this blog. I never blogged about it because we never replaced the floor...it was hideous. I finally convinced Mr Perfect over Christmas to put a new floor in. I love it now!

So here's what we started with...


 This picture was actually taken when we were doing our final walk through before signing on the house in 2009. It seems to be the ONLY before picture I have :(  Sad story. As you can kinda see, there are ugly, nasty shower doors {I hate those things}...a marble countertop complete with flecks of gold, and a sink to match...dark ugly dated vanity...gray-ish, blue-ish, white-ish walls...and lets not look passed all that lovely yellow/camel colored tile. It pretty much covers the whole bathroom.

 And here is a cell phone picture of the new tile we put down for the floor...but you can see the beautiful linoleum we had before. Gag


So here's the deal...we aren't made of money so gutting the bathroom and starting over was not an option. We had to work with what we've got. The yellow tile had to stay. But it's ok...I went with the yellow/gray color scheme! The vanity also had to stay, and the countertop. But that's ok too...paint is my best friend. And thank goodness there are countertop paints out there now!

Ok, so I know you are dying to see it...

if the colors vary, blame it on the fact that there's no natural light in a bathroom :( 


I don't usually put my shower curtain up so high, but the kiddo broke the tension on the rod...it won't stay up now unless it's above those tiles...and let's face it, that's an expensive rod and I'm too cheap to buy another one. Thanks kid


Ignore the lower right corner where a couple tiles are missing...they popped off when the floor was installed and Mr Perfect hasn't glued them back on yet.

To see my project involving that little shelf and the vases, go here


I pretty much love it! I did all the painting and Mr Perfect tiled the floor....not too shabby for his first time!

Your thoughts??


Signature

Pin It!

1.18.2012

One of those days

Do you ever have one of those days where you get in a fight with your sewing machine?? Yeah well, today, is one of those days. GRR!! I don't know what her issue is with me today...yes I called my machine "her"...I think today her name will be Bertha because I think that name is awful and today, Bertha is acting awful. She ate my fabric. She spit some thread at me. And I had to waste a ton of thread when it broke while winding a bobbin! I mean seriously, what is her problem?!?! Tomorrow I WILL win! So watch out Bertha, I'm coming for ya!

PS. I've had a twitch in my lower eye lid for 11 days now. It's seriously annoying. That is all


Signature

Pin It!

DIY Jewelry Rocks!

I LOVE making my own jewelry! Especially when it's easy to do {tehe} I'm definitely NO expert at jewelry making, but I've made a couple things lately that I'm pretty proud of {enter noise of my horn tooting}


Whatcha think? Anyone else like it like I do?


Signature

Pin It!

1.17.2012

Paper Flower Tutorial

This tutorial comes as a request from my sister-in-law. We are going to make the easiest paper flowers EVER! I used them on my crayon garden project

I also made hundreds of them for my wedding a couple years ago. We used them in corsages and boutonnieres, on the cake, and as table decoration.


Ahh, so pretty.....can I have another wedding??? No? Darn

Moving on

Here's what you need...
*Scissors
*Glue Gun
*Cardstock square
I cut a square that is about 3.5" x 4". You can use any size paper. The size of your flower will depend on the size of your square.

Ok, so next cut a circle out of your square. It doesn't have to be perfect by any means. I just eyeball it. Then cut a spiral out of your circle.
The width of your spiral will determine the height of your flower. I try and keep it pretty even all the way around. Also, make sure you leave a little circle in the center like I did. You'll see why.

Next you start rolling the spiral from the outside.

Roll it all the way to the center.
At this point you can leave the flower nice and tightly rolled like this one, or you can loosen it up a bit. To loosen it up, hold on to it loosely and just let it unroll until you are satisfied with it. Doing this will make your flower slightly larger in diameter.

Once you get the size how you would like, put some hot glue under that little circle from the middle of your spiral. That circle makes a base for the flower.

And that's it! Use them to embellish anything you want...make them out of felt or paper. Super easy peasy right!?


Signature

Pin It!

1.16.2012

Oh SNAP!

I have these two pins on Pinterest that I've been wanting to recreate for a while now.
 

source
source

Here's mine :)


I love cameras!

xoxo
Meredith

Pin It!

1.14.2012

Organizing Makes Me Happy

Doesn't organizing make everyone happy???

Do you have a cabinet that looks like this? I bet you do, we all do. This one is above my stove. Drives me nutty! AH! I mean seriously, I don't even know what's in there.


Oh look, this is what was in there! More crap than I realized...{minus the crockpot...that has dinner in it}


Ahhhh, that's more like it. The rest of the crap when buh-bye! Bonus: I cleaned off the top of the fridge by putting those lunch boxes up there :)

I feel the stress melting away....now if only I could get back to that beach in California...

Go get organized!
Meredith

Pin It!

1.05.2012

I'm Leaving...On a Jet Plane

Don't know when I'll be back again...

Just a little joke...I'll be back Tuesday evening :)

Mr. Perfect and I are heading to sunny California, Los Angeles! We are going to see his grandparents, who I have never met before. We are sooo excited! Saturday we have a little side trip too...driving to San Diego to pick up Mr. Perfect's parents from his dad's work conference. It's going to be such a fun little trip for us. And MUCH needed! This is the first trip we've had since our honeymoon.

I didn't have time to get any posts planned out while I am gone, but not to fear dear readers, I will be back soon and I have lots planned! Plus I'm sure there will be plenty of pictures to share ;)

Anywho, toot-a-loo!

Much Love~
Meredith

Pin It!

1.04.2012

Piano Runner

I recently decided to decorate my formal living room...yes I've lived in my house for 2 years and haven't touched that room yet...don't judge. You may have seen my painted curtains and my flower painting that are in the living room now. I also have a piano in there that I've been working on decorating. It's been looking weird and I couldn't figure out why. Then it occurred to me...I need a runner! There was too much wood...it looked naked!

I didn't really have time or the desire really to go searching for the perfect fabric or even take the time to make one. Blame it on too much to do in too little time...or laziness. So I used the same fabric I used on my pillow shams for the love seat in our bedroom. This project literally took me 10 minutes. It's not the most complicated or spectacular project ever, but it works for now and that's all I care about.


I actually have stuff sitting on top of the runner, but I took these pictures before I decided what to put up there. It really does look nicer with stuff on top, I pinky swear :)

Much Love~
Meredith

Pin It!

1.03.2012

A Bed for the Poochy

My dog Carmen is in DESPERATE need of a new dog bed. With that being said, let me tell you why I dislike dog beds....

1. They are too expensive for how quickly they wear out
2. The ones that are relatively cheap, don't have zippers to wash the outer shell
3. If you can take the outer shell off, the inside can't be washed

These things lead to a smelly dog bed and a smelly dog. No fun.

Oh, and let's not forget that dog beds get flat super fast. I then feel guilty that my baby girl doesn't have a nice plush place to lay down.

Let's just take a look at what her bed(s), yes I said beds, look like


She definitely looks comfy on her 3 beds, but seriously, they are gross.

So I bought some super cheap fleece at Joann's black friday sale and made her a new bed.
It was super easy. I just folded the fabric in half, sewed in a quick short zipper on one end and then filled it with old towels I cut into strips. Now I can wash the outer shell AND the inside stuffing. Everything will stay so fresh and so clean! Win Win!


I think she digs it!

Much Love~
Meredith

Pin It!
Related Posts Plugin for WordPress, Blogger...