5.31.2011

Red Paint=Heartache

Have you ever painted a wall red?
No? Well don't.
Really, it's not fun
If you decide to brave this difficult color, follow my advice and do some research first.

I, on the other hand, did NOT do my research, which is sooo not like me.
I ended up spending half the day kicking myself in the patootie for this costly mistake.

So apparently you are supposed to prep your wall with a gray tinted primer first. 
As you probably guessed, I didn't do this. 
My wall was a Glidden color called Tawny Birch (it's a buttery kind of color)
In other words, NOT very dark.

So let me start by saying that I didn't paint an entire wall, but part of a wall. I have vaulted ceilings in my family room and I painted just the top triangle part on one end of the room.
Can you visualize this?
If you can, you probably see me precariously perched on my dads extension ladder hand holding my paint tray.
Dangerous? Oh yes!
Maybe a little stupid? Sure!
A gigantic pain in backside? Absolutely!!

I put my first coat of paint on the wall.
It looks like poop.

I put my second coat on.
It looked even poopier (totally a word)


YUCK-O!

You would have thought I let my 9 year old do this. It looked so terrible. All of the lap lines were darker. It didn't cover very well. I was upset. I was frustrated.

At this point I did what I should have done in the first place and googled it. Oh right, I didn't prime. Rats.

So I did what I do when I get frustrated...I had a piece of cheese.
Ahhh, much better.
Then I made another trip to Home Depot for another can of paint.

This time I picked up a slightly better shade of red by Behr Paint and Primer in one.
I figured with all that red already down, the paint/primer would do just fine.
It worked like a charm!
One coat and I had a perfectly painted triangle wall section that I love.
It really adds so much to this room


Suppose I learned my lesson on that one! Don't expect to see any more red painted walls in this house any time soon

Much Love~
Meredith

Pin It!

5.28.2011

Art from Bathroom Trash??

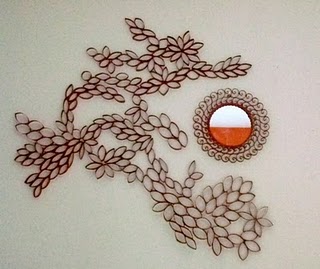
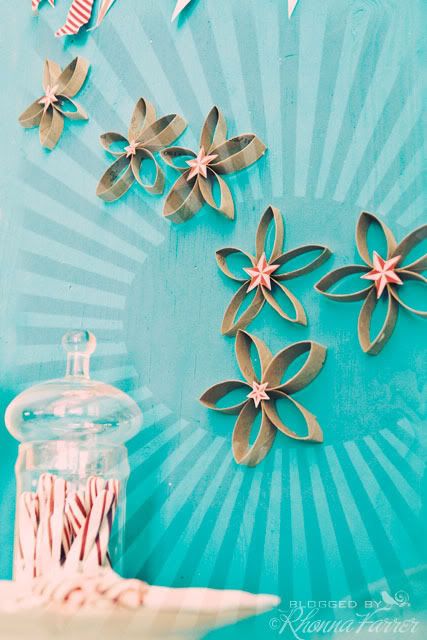
I've seen several things lately using toilet paper tubes, of all things, to create super cute and unique works of art.

Like these:
Homemade Mamas


Rhonna Designs
Creative Jewish Mom


Super cute right? And CHEAP!

So here's what I did to make my very own.

I started with toilet paper tubes, paper towel tubes and one ginormous wrapping paper tube

Smash them all in half like so and cut into strips. I didn't measure, but you could. I thought the varying heights gave it a little more interest. Plus, as you know, I'm lazy.

 I ended up with 2 piles because my wrapping paper tube was a different size. In the end I decided it didn't matter and just mixed them all up.


Then pick your design and hot glue them all together. This is very tedious. I suggest watching something fabulous on tv while you do this.


To paint it, I tried to use spray paint, but it didn't want to stick very well. So I used white spray primer instead. You could put paint on top of the primer if you want, but this piece is going up very high in my family room and I felt like it didn't really need the extra paint. 

Here it is on the wall.


Gorgeous! Don't cha think? I love it!

Don't you just love my red wall? Another post on that disaster coming very soon!


Much Love~
Meredith

Pin It!

5.27.2011

Birthday Bag Tutorial

Wednesday was my birthday! YAY! I'm still excited cuz birthdays and parties make me smile
In yesterdays post I gave you a peek at the purse I made for myself.
I pretty much love it, flaws and all.
I've never made a purse like this, and I didn't follow a pattern of any kind so there are plenty of things I'm not entirely happy with and/or would do differently next time.
You live and learn, right?

This is also my first tutorial so bear with me. I may have forgotten to take pictures of some of the steps, but I will try and explain what I did as best as I can mmmkay?

Here we go!

I was browsing at Joann the other day when I ran across these wooden purse handles
 Um, do you see the $.97?? Hello, sweet deal! 
All I did to finish them was paint them with white acrylic paint, lightly sand and spray with a clear glossy acrylic top coat. Super easy-peasy. Looking back, I should have maybe put a second coat of paint on them, but oh well.

Next I cut my fabric. Here is what you will cut:
1- 19"x17" of your outer fabric
1- 19"x17" of your liner fabric
1- 19"x17" fusible fleece 
2- 11.5"x4.5" of your fabric for the handle tube
2- 11.5"x4.5" fusible interfacing

Iron the fusible fleece to your outer fabric. I almost always use fusible fleece on bags, it gives them an extra amount of sturdiness and softness...we don't want any floppy bags now do we?! 
Also iron the fusible interfacing to your smaller strips.

Next fold the outer fabric in half along the 19" side (does that make sense?), right sides together. Do the same with your outer fabric. I measured up the 2 sides about 6 inches and put a pin there. You can change this measurement to suit yourself. Then sew from the fold up the sides to the pin, backstitching at both ends.
 Do this with both the outer and inner fabrics. It should look like this

Turn your lining fabric right side out and place inside the outer fabric. Pin together all the way around. 

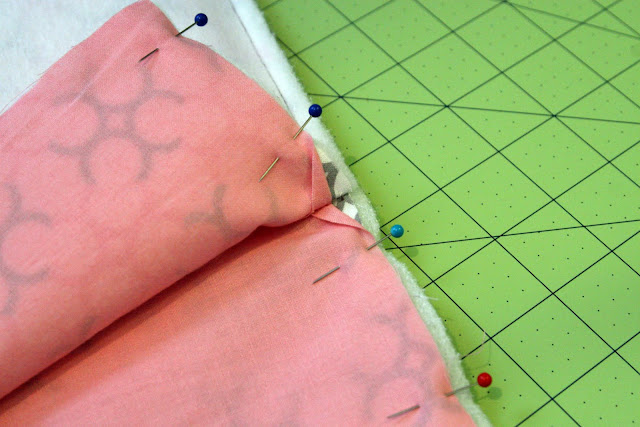
Where your front pieces and back pieces meet will be a little tricky lining up. Just go with it. Mine looked like this. Just make sure you get both sides under your machine when you sew them together.

Start on the top of one side and sew continuously around the entire bag. Don't forget to leave a hole on one side to turn it right side out! When you sew down the side slit towards that little tricky spot, go slowly. You will have to stop right in the middle and move the body of your bag from the front of your machine to the back so you don't sew the top to the body. Get it?? Maybe, I hope. Here's a couple pictures. In the first one you'll see all the fabric under my top flap there, and then I moved it to the back.


Ok, so here is where I temporarily got caught up in what I was doing and sorta stopped taking pictures. Oops...won't do that again.
Anywho, moving on. Next step, turn bag right side out and sew opening shut. Then I top stitched along the slit on each side. Go down one side, turn, go across the bottom, turn and go up the other side. I backstitched at the bottom to give it a little extra durability. 
Use a long stitch length and stitch across both top sides only backstitching at the beginning.
Pull your bottom thread to create a gather along the entire top of each side until it measures 11"
Are you following me?
Take your fabric pieces for the handle tubes and iron under 1/4" on each of the short ends. Stitch to finish the ends.
Now iron the long ends under 1/4" also.
I took these pieces and pinned them to the top edge of the bag on the inside first. You want to make sure you are covering up the stitching you used to make the gathers. Do this on both sides and stitch close to the fold on the tube piece. I really hope this is making sense.
Next lay your handle down and fold the fabric over to meet the front side.
 I have a picture for this! Yay!

I had pin about a third of it at a time and sew, then stop to adjust the handle, pin a little more and sew. It was too difficult to try and sew around the curves of the handles. When folding the fabric over and pining down, feel for the back and try to line them up together so you can sew straight on top of the back stitches. I didn't necessarily to the best job at this, but hey, it's my purse so I'm cool with it. It looks great on the outside, just don't check my stitching on the inside *blush*

This is where I should post an after picture and a big TA-DA! BUT, I got done and decided I didn't like how the bottom corners poked out so sharply. I thought I nice curved corner would look better. Here is where hindsight rears it's ugly head. 
So if you are actually following my directions you will want to make your curved corners BEFORE you sew this thing shut...wish I had thought this out a little better. To do this, use a water soluble marker and mark a 3 inch line in a diagonal from the bottom edge to the side, like you are making a triangle out of the corner. 
Still hoping I'm making sense here...
Sew on that line, backstitching at both ends. Then cut close to your stitching. Do this on both bottom corners of your outside and liner. 
Since I didn't do this before I sewed it shut I had to improvise and once again, it's not perfect, but since it's my bag and no one else will see my mistake, I'm cool with it. So basically I turned the bag inside out and had to sew my liner and outer bag together at the corners, then cut it off and use a zigzag stitch to keep the edge from fraying. Boo.

Definitely DON'T do it this way. I'm kinda bummed I didn't get the chance to clip these corners before I closed it all up, but oh well I guess. 

And for the big reveal...


Although there are flaws and things I would have done differently, I'm proud of it. I LOVE the fabric. It is surprisingly roomy too!

So how did I do? Are you completely confused by my tutorial and lack of pictures?
I'll do better next time...promise...pinky swear...cross my heart *wink*

Much Love~
Meredith

Pin It!

5.26.2011

Celebrating 29 years of ME!

YESTERDAY was my wonderful 29th birthday (yes, it's the first time I've been 29)!
WOOHOO!

It was a pretty darn good day.
I started the day off with a fabulous FREE back pop from my chiropractor
I feel nice and tall and "right" again

Then we went to US Toy Playthings for some party supplies
No trip to US Toy is complete without a photo shoot with fun hats! DUH!


 A lovely hamburger hat

 Big hotdog YUM

 Ball and Chain...yep that's how we train those kids 'round here

 MOO

 Googly-googly-googly

What is this you ask? Me, being a fierce flesh eating crab. No?

Next on the agenda included driving through torrential rains and getting locked inside a Dollar Tree while the tornado sirens went off...again...oh the joys of living in the midwest

Ok, skip the storms
Time for PRESENTS!!


 Super lame and not creative at all, but I asked Mr Perfect to get me watch batteries for 4 of my watches. They all have dead batteries and I can never seem to remember to get new ones. I was thrilled to have my lovely time keeping arm candy back in working order!

 Sunglasses...in brown. Ignore, how freakish my finger looks and the weird expression on the kiddo
 Sunglasses...in black
Back Massager! Yay, now the hubs can rub my back ALLLL the time. Bet he didn't think that one through!
And last, a new bike! I've been dying for one so the kiddo and I can ride to the park (I'm too lazy to walk)

As it turns out, I'm a little rusty on a bike. As I'm about to crash into the curb I say to the kiddo "I don't know how to turn!" She replies with her best 9 year old attitude "Turn the handlebars!". And she left me in dust. Thanks kid. I'll have to do some secret practicing so she doesn't put me to shame like that again!

The rest of the afternoon was spent doing some light housework for my guests that evening and finishing up this purse I decided to make for my own birthday gift.

Quasi-tutorial for this tomorrow :)

So on birthdays in my family we usually get together with my parents, grandma and sister and go to dinner somewhere. Well my parents are in Hawaii celebrating their 35th anniversary (Hooray!) so scratch that tradition. Instead we had my sister and her man and a couple friends over for bbq chicken, brats, and some FANTASTIC cupcakes! It was low key, but fun. Anywho, you HAVE TO see these cupcakes my sis made. They are the most gorgeous works of art! I mean, to DIE for! Have a look-see:


UH-MAZING!!! I absolutely LOVE how the butterflies are perched on flowers! She has some mad skills and insane knack for baking the most gorgeous cupcakes. LOVE YOU SIS!!
So that was about it for the day. Total picture overload here but I had to share my great day.

Much Love~
Meredith

Pin It!
Related Posts Plugin for WordPress, Blogger...