Showing posts with label Refashioning. Show all posts

2.10.2013

T Shirt Quilt

I said I was back to blogging, then I disappeared again! Argh!
There is an explanation.... one that you will see here soon through some posts I WILL write :)

This may be long overdue, and since there is no threat of spoiling my sisters' Christmas present anymore, I'm sharing with you the T Shirt Quilt I made her.

My sister has always been a very skinny person, but in the past year or two she has (sis forgive me) put on some "happy/beer" weight. As a result, she has had to part with all her beloved clothes. She brings bags of clothes to me to go through before we donate them. I gotta admit, she's got some great stuff! She had no clue I had been holding onto all the t shirts she's parted with. She is a yoga pant, t shirt kinda gal, so I know it was hard for her to get rid of her fun shirts. So for Christmas I decided to make her a t shirt quilt.

I've debated on making a quilt before, but just never gave it a go. After doing this quilt, I may have to throw in the towel and never make another one again. SO MUCH WORK! And math too....geez I hate math...


Not the best picture in the world...

She loved it! The back is a soft fleece. It is a black base, with brightly colored flowers all over it. I was actually surprised that the binding was as easy as it was. I expected it to be much harder! I also did NOT use any batting. I figured with the fleece backing, it would be thick enough and warm enough without it. Plus, I'm cheap and batting is not!

In the end I was happy that she was happy! This project definitely put my patience to the test, but I loved out it turned out!


Signature

Pin It!

6.19.2012

{Sewing Tip Tuesday} #15


I know I didn't have some genius tip to share last week. And I don't have one to share this week either. BUT, I do have a little tutorial and it involves sewing so that counts, right? I think so!

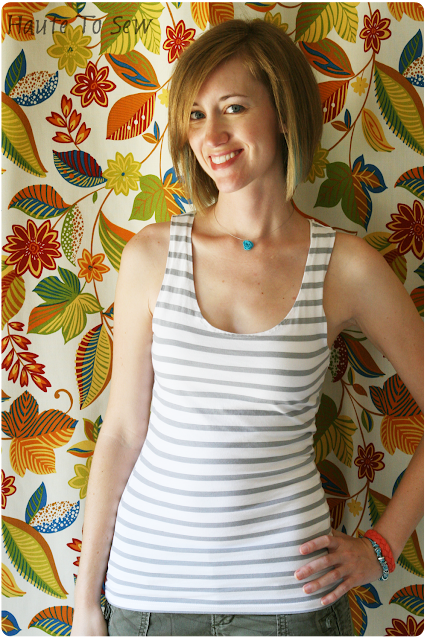
I made this comfy tank about a month ago and have been wanting to share it with you, but I every time I've worn this shirt I forgot to take pics. Call me lazy or whatever, but I finally got around to pics of it on.


I started with this $3.00 shirt I picked up from Walmart on clearance. I loved the stripes and I love gray.


So first thing I did was cut the collar out of it. I knew I was going to cut the sleeves off and I didn't feel like that banded collar would work without the sleeves. After I cut off the collar I folded the edge down and top stitched it with a double line.


Next I used a racer tank that I already had to draw out where I wanted to cut the sleeves off at. Cut them out and hem the arm holes with the same double stitching.


Now you have made a basic racer back tank from a long sleeved shirt. You could stop here, but I decided to add some ruffles on the back. Make it a little spicy!

I didn't really measure this part. I just cut some strips of fabric from the sleeves and gathered them. Then pinned them on the back of my tank, matching up the stripes as best I could.


The top stripe I sewed upside down first, then flipped it down and top stitched it. I did this so the unfinished edge wouldn't show up by my neck. The other 2 ruffles are partially hidden from the ruffle above it so it didn't really matter. But you can do what you feel looks best.


That's it! Put it on and strut your stuff!


I'm not entirely sold on the ruffles on the back, but I haven't heard anyone say anything negative yet, so I'm going with it for now. The only I thing I would change is that I wish I had known about this tip about sewing with knits before I had made this shirt. I feel like my seams are a little wavy and had I known how to fix that I would be happier. But, next time I will know. Overall, I'm still excited about it :)

Guess what else I'm excited about??? I received a national award for my photography at work!!!! This is the second time I have won one of these awards. Although I'm in a category with higher standards this time because of my experience with the company. Anyway, it's still nice to be recognized for your work once in a while. Yay!


Signature

Pin It!

6.14.2012

{How Pinteresting} #14


I'm excited to show you this weeks Pinterest project! It's where you get to see the team name we went with for the washers tournament I talked about last week

First let me show you the inspiration..... This one comes from Crafterhours. She has a cute way of refashioning those old tshirts you don't want to wear, but can't bear to throw out.

source
Last Saturday we were in a washers tournament. If you don't know what that is, check out my post from last year and the sweet shirts I made for us. We decided to rock a different team name this year, which means new shirts. I already had a couple men's large white tshirts laying around from the anniversary shirts I made last month.

I used my new Silhouette to cut out freezer paper stencils and painted our new name on these shirts. So Mr. Perfect's shirt was good to go after that. Mine needed some tweaking. I'm not gonna wear a men's large tshirt out of this house. So I took in the sides  to make it my size, then followed the tutorial on Crafterhours. It's super simple and doesn't take much skill at all. Here's what I came up with......


Ignore the bra straps please, and thank you.

I was pleased with how it turned out. And for a shirt I was only going to wear once, it's better to make something quick and easy.

I bet you are dying to see how they looked after I painted our team name on.....and what is our team name???

It's offensive, but hilarious :)


SEXY PITCHES!!!!!!!!!! LOL  Get it??

We didn't win this year, but we still had a good time. More picture to follow tomorrow on Insta Friday.


Signature

Pin It!

5.16.2012

Freezer Paper Stenciling Tutorial

You all know I just had my 2nd wedding anniversary. And you saw my gorgeous anniversary band Mr. Perfect bought. Well I don't believe I told you what I did for him. His main gift was this baseball gift basket I put together with tickets to the Royals vs. Yankees game. We had a blast! But there was something else....

Something a little funny and kinda an inside joke, but I'm gonna tell you about it anyway.

A couple weeks before the big anniversary, Mr. Perfect and I were looking online to see what the 2nd anniversary gift was. The traditional was cotton.

Me: (listing off various cotton gifts described online) Babe, it says clothes, linens, napkins, a bunch of stuff that doesn't sound like anniversary gifts.

Mr Perfect: Like a t-shirt that says "all I got for my 2nd anniversary was this lousy t-shirt".

And then we both laughed until we had tears coming out our eyes and couldn't breathe. See, so it's kind of an inside joke, but you might chuckle a little at it anyway. But seriously, after a joke like that, I couldn't not make a shirt that said that!!

I decided to make this my first try at using freezer paper to stencil something. I printed off on the computer what I wanted it to say and gathered my supplies.


I had decided to do 2 t-shirts that were matching so it could be a "his and hers" type thing. Plus, if I screwed one up, there would always be another one.

I cut 2 pieces of freezer paper the size of my printed paper and layered them on top. I figured I could cut 2 stencils at a time to save me from spending an entire week cutting out words for my stencil.


Then I got to work cutting out my stencil with an exacto knife. If you cut out words like this, you should probably rent a movie.....just sayin. Here's my stencils all cut out.


And here is the pile of dots and such for the inside of the "O", "A", "R" and "D". Can't forget about those!


Next all you do is iron your stencil to your t-shirt. Then paint! I used a sponge type brush and dabbed the paint on there. To make the shirt washable, make sure you mix fabric medium into your paint before you start applying it.


After it is all dry, tear the stencil off your shirt and you are done!


They both turned out great! So he got the navy colored shirt and I got the teal one.

Now here's how he reacted when he opened it.....

We were sitting there, each of us with a shirt sized box in front of us. We had both said this box we were giving each other wasn't the real gift (mine was the baseball gift basket and his was the ring). I think we were both thinking the same thing......that the other one had a gotten a t-shirt with that saying on it. He opened my gift first. And he didn't laugh very much or anything. I thought it was weird. He thought it was hysterical when we joked about it. So I opened his gift. He had made a t-shirt for me that said the same thing! He had printed on an iron-on transfer and just ironed it on a shirt. Not nearly as crafty as me, but hey, gotta hand it to the guy for making me a shirt!

I'm sure you are tired of my babbling and reading about my inside joke with my hubs. Hope I didn't bore you to death! On a crafty related note....I kinda like the freezer paper stenciling. Might be doing more with that here soon!
 

Signature

Pin It!

4.03.2012

{Sewing Tip Tuesday} #8

Hi y'all!
Hope you all had a great weekend!

It's that time again...


Today isn't so much a tip as it is a tutorial. Raise your hand if you love that! I do!

I went through my jeans this weekend and had a pile that looked like this

Yowzers! That's a lot of jeans!
I took out the ones that fit me well that I actually wear. And the ones that are too small (that I dream about squeezing into again one day). And the ones that are too big (that I plan on refashioning into pregnancy jeans if that dream ever happens).
This is what I was left with...

A decent stack of jeans that I either want to hem, turn into skinnies, or cut up into shorts.
Since it's been like 90 blazing degrees for the last 4 days I went with shorts first. 
I wanted to be able to turn a pair of jeans I don't wear anymore into something trendy. We all know that elusive money tree does NOT grow in my backyard and I'm not the person in Kansas that won the megamillions! So I'm wanting to update some of my seriously old clothes to better suit me.

I saw these shorts as inspiration
source
Here's the jeans I decided to use

They just scream MOM JEANS!!!!!! AH!! No thanks
New shorts, here we come!

Start by deciding how long you want them to be and add an inch and a half. The best way to figure this out is to measure from your crotch down on the inseam. I wanted mine to have about a 3.5-4 inch inseam so I cut them at 5 inches.

NOTE: You can always cut more, but you can't add length back. Cut conservatively!! {unless you just love booty shorts}
 
Fold your jeans in half to cut them...it makes it easier to get the same length on both legs. Also, don't cut straight across, cut at a slight angle...it is more flattering and looks more like you bought them than did a hillbilly refashion


Next roll your new shorts however much you want. I wanted about an inch to inch and a half cuff. It also looks better if the cuff is slightly smaller in the back, but that's just my personal opinion. 

Then iron your cuff well! Like, stream the crap out of them. I think I even starched them a bit. I want to kinda train the fabric where to lay down.
ignore the hideous ironing board cover that's so thin you can see the ironing board through it. it's gross, I know.

To keep your shorts from unrolling every time you wash them I tacked them down on the side seams. I just kinda folded over that seam allowance part that's sticking out and sewed behind it, like 5 or 6 stitches should be fine. Don't forget to backstitch!


I also did some distressing on mine to make them look more trendy. If anyone is interested in how I did that, let me know and I'll do a tutorial!!

Here's what they look like at this stage


They're pretty good, but they need something else....

Throw them in the wash and the distressing and the edges will fray a bit more. 
Then they look like this...


No I'm not trying to show you my butt! 
I want you to see the distressing on my pocket and how the cuff in the back is smaller than the one in the front.

Not bad for a new pair of shorts huh? 
I'm also thinking about dyeing them darker. I saw someone do it on Pinterest and I have several pairs I think it would work with. 

Get out your scissors and make some shorts!

Signature

Pin It!

12.31.2011

My 2011 Favorites

I can't believe another year has flown by already! Sheesh.

Anywho, I know I haven't had this blog ALL year long but I've seen a lot of people doing end-of-the-year recaps of their favorites or most popular posts or whatever. So here's my 12 favorite blog posts/projects from this year...meaning, mid-april till now :) Oh, and I would do a countdown, but I just can't pick a favorite! UGH, I just LOVE all my projects!! Does that make me conceited or narcissistic?? Oh well, it's my blog and I can brag if I want to  ....right?!?


In NO particular order ;)
Manly Tablet Cover
Refashioned Shirt and Skirt

Statement Necklace
Melted Crayon Garden
Chalkboard Door
Braided T Shirt Bracelet
Yarn Word Art
DIY Halloween Costumes
The best yarn trick ever
Toilet Paper Tube Art
Interchangeable Flower Headband
Mod Podged Plates


So there you have it, my favorites from 2011 :) Can't wait to see what 2012 brings!

Wishing everyone a prosperous and safe New Year!!

Much Love~
Meredith

Pin It!
Related Posts Plugin for WordPress, Blogger...