Showing posts with label Sewing. Show all posts

2.10.2013

T Shirt Quilt

I said I was back to blogging, then I disappeared again! Argh!
There is an explanation.... one that you will see here soon through some posts I WILL write :)

This may be long overdue, and since there is no threat of spoiling my sisters' Christmas present anymore, I'm sharing with you the T Shirt Quilt I made her.

My sister has always been a very skinny person, but in the past year or two she has (sis forgive me) put on some "happy/beer" weight. As a result, she has had to part with all her beloved clothes. She brings bags of clothes to me to go through before we donate them. I gotta admit, she's got some great stuff! She had no clue I had been holding onto all the t shirts she's parted with. She is a yoga pant, t shirt kinda gal, so I know it was hard for her to get rid of her fun shirts. So for Christmas I decided to make her a t shirt quilt.

I've debated on making a quilt before, but just never gave it a go. After doing this quilt, I may have to throw in the towel and never make another one again. SO MUCH WORK! And math too....geez I hate math...


Not the best picture in the world...

She loved it! The back is a soft fleece. It is a black base, with brightly colored flowers all over it. I was actually surprised that the binding was as easy as it was. I expected it to be much harder! I also did NOT use any batting. I figured with the fleece backing, it would be thick enough and warm enough without it. Plus, I'm cheap and batting is not!

In the end I was happy that she was happy! This project definitely put my patience to the test, but I loved out it turned out!


Signature

Pin It!

6.19.2012

{Sewing Tip Tuesday} #15


I know I didn't have some genius tip to share last week. And I don't have one to share this week either. BUT, I do have a little tutorial and it involves sewing so that counts, right? I think so!

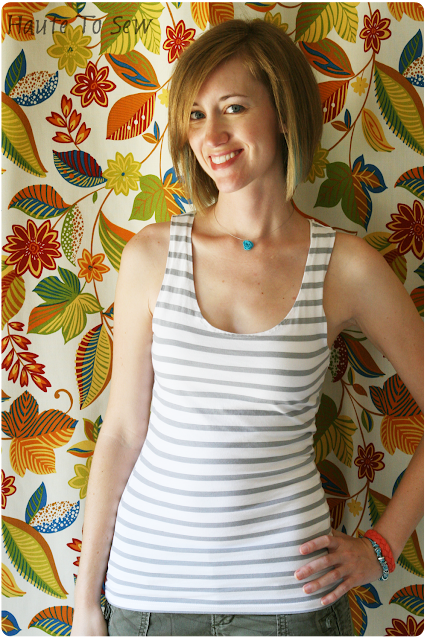
I made this comfy tank about a month ago and have been wanting to share it with you, but I every time I've worn this shirt I forgot to take pics. Call me lazy or whatever, but I finally got around to pics of it on.


I started with this $3.00 shirt I picked up from Walmart on clearance. I loved the stripes and I love gray.


So first thing I did was cut the collar out of it. I knew I was going to cut the sleeves off and I didn't feel like that banded collar would work without the sleeves. After I cut off the collar I folded the edge down and top stitched it with a double line.


Next I used a racer tank that I already had to draw out where I wanted to cut the sleeves off at. Cut them out and hem the arm holes with the same double stitching.


Now you have made a basic racer back tank from a long sleeved shirt. You could stop here, but I decided to add some ruffles on the back. Make it a little spicy!

I didn't really measure this part. I just cut some strips of fabric from the sleeves and gathered them. Then pinned them on the back of my tank, matching up the stripes as best I could.


The top stripe I sewed upside down first, then flipped it down and top stitched it. I did this so the unfinished edge wouldn't show up by my neck. The other 2 ruffles are partially hidden from the ruffle above it so it didn't really matter. But you can do what you feel looks best.


That's it! Put it on and strut your stuff!


I'm not entirely sold on the ruffles on the back, but I haven't heard anyone say anything negative yet, so I'm going with it for now. The only I thing I would change is that I wish I had known about this tip about sewing with knits before I had made this shirt. I feel like my seams are a little wavy and had I known how to fix that I would be happier. But, next time I will know. Overall, I'm still excited about it :)

Guess what else I'm excited about??? I received a national award for my photography at work!!!! This is the second time I have won one of these awards. Although I'm in a category with higher standards this time because of my experience with the company. Anyway, it's still nice to be recognized for your work once in a while. Yay!


Signature

Pin It!

6.14.2012

{How Pinteresting} #14


I'm excited to show you this weeks Pinterest project! It's where you get to see the team name we went with for the washers tournament I talked about last week

First let me show you the inspiration..... This one comes from Crafterhours. She has a cute way of refashioning those old tshirts you don't want to wear, but can't bear to throw out.

source
Last Saturday we were in a washers tournament. If you don't know what that is, check out my post from last year and the sweet shirts I made for us. We decided to rock a different team name this year, which means new shirts. I already had a couple men's large white tshirts laying around from the anniversary shirts I made last month.

I used my new Silhouette to cut out freezer paper stencils and painted our new name on these shirts. So Mr. Perfect's shirt was good to go after that. Mine needed some tweaking. I'm not gonna wear a men's large tshirt out of this house. So I took in the sides  to make it my size, then followed the tutorial on Crafterhours. It's super simple and doesn't take much skill at all. Here's what I came up with......


Ignore the bra straps please, and thank you.

I was pleased with how it turned out. And for a shirt I was only going to wear once, it's better to make something quick and easy.

I bet you are dying to see how they looked after I painted our team name on.....and what is our team name???

It's offensive, but hilarious :)


SEXY PITCHES!!!!!!!!!! LOL  Get it??

We didn't win this year, but we still had a good time. More picture to follow tomorrow on Insta Friday.


Signature

Pin It!

6.11.2012

Blog Swap with Crafty Meggy

Hi friends!! I have a special treat for you today! I am doing a blog swap with Megan from Crafty Meggy! She's super sweet and has a great tutorial for you, so be sure to hop on over to her blog and show her some love! Take it away Megan......

                                       ---------------------------------------------------------------


Hi to all of you Haute to Sew readers! I'm Megan from, Crafty Meggy, and I am so excited to be guest posting here at Haute to Sew today!! I found Meredith's blog at a link party where she pinned her pinterest inspired coffee table. I took a look around and really liked what I saw and contacted her. So here I am today! I thought I should introduce myself and then I'll share a tutorial for a cute twirly skirt that I made. First off, I am a mom to 3 wild boys, ages 7, 5, & 22 months. They keep me on my toes and busy all day long.... as long as I'm not working on a project! :) Now that school is out for the summer I'm going crazy trying to find things for them to do all day so that I can still continue my craftiness. My husband and I have been married for 9 years and are also partners in a photography business. He's the graphic designer and I'm the photographer. The perfect match! I have always been crafty and into doing crafty things. I started out paper scrapbooking in high school and continued it until I had kids. That's when I discovered digital scrapbooking. Have you ever tried it? Well, you need to because it is Amazing!! You can have your "mess" on the computer and not worry about the baby running away with the scissors. This past fall I got into making hair bows, even though I don't have any girls. I just needed to do something crafty and I have tons of friends who have girls and have been making bows for years, so I finally gave in. And I didn't stop there! My wonderful husband bought me a Silhouette Cameo for Christmas and I've been using it non-stop for projects and all sorts of things. My husband was yet again wonderful and got me the exact sewing machine that I wanted for my birthday in April! I've been enjoying it non-stop since. I recently signed up for my local Artisan Market (it's like the Farmers Market, but with mostly crafty booths) and I'm trying to build up my inventory for that. I'm mainly making girls dresses, skirts, baby bibs & burp cloths, and hair bows. I'm really excited about this new adventure and hope it will be a good experience!


Today, I wanted to share an easy tutorial for a skirt I made recently. I'm a beginner in sewing and this skirt was easy for me to make so if I can do it, you can too!:) I started out with some left over fabric from a dress I created for the 4th of July (you can buy it in my Etsy Shop here):
I made my skirt a size 2T. The measurements for that size are below. If you want it bigger you'll have to figure that out based on the measurements you get from your model:) For this project you'll need: 1/4 yard patterned fabric 1/8 yard contrast fabric elastic (about 20" will be good. I cut off 37" and had about 12" left over.) I used 1/4" thick elastic. I found this tutorial on Nap Time Crafters blog and she didn't give a width or amount so I used what I had on hand. Ok, once you have your fabric picked out, cut out 2 pieces of the main fabric to be 9x22. For the trim cut 2 strips measuring 1.5x36.


Next, with right sides together, sew up the sides of the main fabric and the trim. (Can you tell that they're sewn together? If you can't, just take my word for it:) hehe)


Now you need to make the casing for the top of the skirt. fold down the fabric a 1/4" then another 1/2". Press. I like to pin mine because I don't trust the iron enough:)

 
Sew as close to the edge as you can to make the casing. Leave an inch to feed the elastic through.
 

I put a bobby pin in the end of my elastic to feed it through.


After you feed it through sew the two ends of elastic together and then close up the opening.


So that the elastic doesn't move while wearing it I picked an inconspicuous spot and stitched it in place.


 Voila! You have the main part done!


Gather your trim fabric and then stretch it to fit the bottom of the skirt.


Once you have it the right size pin it to the dress with right sides together and sew it on. I had to adjust mine as I sewed.


And you're done!! Doesn't it look CUTE??!! It was so easy and fun I think I might just make more of them. I have this one for sale in my Etsy shop if you want to look at it there. The hardest part for me was adding the trim. In the tutorial at Nap Time Crafter she said to top stitch the seam line to help the trim lay flat. I didn't do that because I pressed the seam line the other way. I just thought it worked better like that, but I can totally see what she means now. Maybe I'll go back and press it up the other way. Thanks for coming by to see my fun twirly skirt tutorial! I hope you'll come visit me over at my blog. Let me know what you think of the skirt. Also, if you have any sewing tips or ideas for me, since I'm totally new to this, I would love to hear them!! Thanks for swapping posts with me today, Meredith! It was a lot of fun and a different experience for me. This is my first blog guest post! Could you tell?:) I hope you have a great day!
                                     ---------------------------------------------------------------

BIG thanks to Megan for swapping with me today!! Hope you all enjoyed her tutorial. Such a cute skirt!


Signature

Pin It!

6.07.2012

{How Pinteresting} #13


Ever so slowly I've been decorating my living room. I'm pleased with the progress and I'm super excited about the ideas I have for some upcoming projects in that room! So, obviously this week's Pinterest project is something in my living room, duh! Here's the inspiration:

I pinned this picture of these super cute bow pillows from Rae Gun Ramblings. Aren't they just so adorable??

I have these three really cool chairs I picked up on craigslist in my living room. They are a little boring without any pillows so I spiced them up!

Pillow #1 got the bow treatment


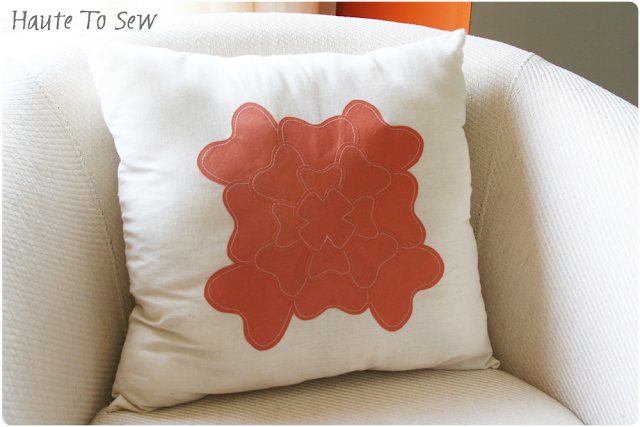
Pillow #2 I made a little appliqued flower


Pillow #3 is a basic pillow made with this beautiful fabric I picked up at Joann's


They all kinda perked up the room just enough. The room is slowly coming together :)


See if you can spot my other DIY project on these chairs..... if you follow me on Instagram (meredith_hautetosew) you may already know what it is. I'll share it with you next week! Stayed tuned peeps!


Signature

Pin It!

6.05.2012

{Sewing Tip Tuesday} #14


This is going to be the MOST useful tip for anyone that sews on knit. It blew my mind when I saw it. Seriously. This will change the way I feel about refashioning some of my clothes, as in, BRING IT ON!

This tip comes from Jessica at Me Sew Crazy. Isn't her blog name just hilarious?? I love it. Ok so check it out, she says to keep your knit seams from stretching out and looking all wavy, but tissue paper under your piece as you send it through your machine. 

source
source
How brilliant is that??? Guess I've got some refashioning to catch up on this week :)

Go give Jessica some love for such an awesome tip!


Signature

Pin It!
Related Posts Plugin for WordPress, Blogger...