2.29.2012

Kitchen Remodel

Right before Christmas we decided to finish remodeling our kitchen. See, we half did things 2 years ago and never got around to the rest. We talk about what we want to do with certain spaces and then never get around to doing it.

This is going to be a lengthy post with picture overload so bear with me, mmkay?

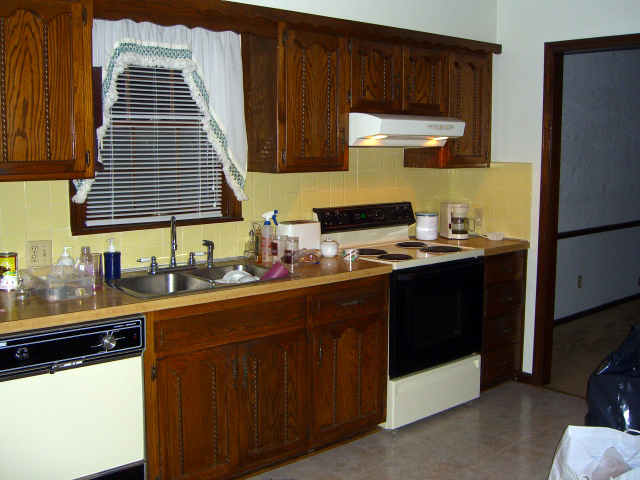
So here's what we started with over 2 years ago...


These pictures were all taken before the previous owners were completely moved out so their junk is still sitting around everywhere. But seriously, don't these pictures make you want to puke?!? I do {gag}.

When we first started working on fixing up this revolting mess, we removed those weird decorative barrier wood things on top of the bookcase. And the heavy cedar beams that run around that opening to the kitchen. Buh bye! I mean, what are those things away? Hideous! So if you look at the cabinets, there is this weird braided thing running down the inset on all of them. Those were barely stapled on so we popped those off too. And we also did away with all the ugly scalloped trim along the top of the cabinets.

Ok, so after we did that destruction, next came paint. Painted the cabinets, the walls, trim, painted that bookshelf, got a new dishwasher and fridge and all new hardware.  And then we stalled out. About a year later I couldn't stand that awful lemon yellow tile. We put up a faux tin backsplash. Then another year went by. We had talked of putting a bar top on the top of the bookshelf and adding a kitchen island, but never did. And lets not forget that we still had the old fake butcher-block laminate countertops. I LOATHE those counters. They are the same ones my parents had growing up, ugh, gross.

Now that you are up to speed on what we did in the beginning, let's talk about what we completed this Christmas....

I want a kitchen island. Mr. wants the bar top. Are they both going to fit and still have walking room?? We don't know. I found a desk with a hutch on Craigslist for $20 that I wanted to convert into the island. It was solid wood and in excellent shape. So we brought it up into the kitchen and put an old door on the bookshelf to see if this was going to all work.


Yep! Looks like it will work out just fine :)

When we were doing this, we were shocked at how perfect that door was. Right length. Right height. And free! I'm totally giving Mr. Perfect credit for this idea...it was all him. Saved us from having to buy wood. I LOVE the fact that we recycled a door that had no use in the basement. Win Win!

Let's get to the good part....the REVEAL!!! YAY!!


It's a breath of fresh air in here. I absolutely love how it all turned out!

Our kitchen has been so much more useful since adding the island and bar. See the laptop over there on the end of the bar? Yep, that's where I sit to do all my blogging and blog stalking and pinning :)

Let's look at the before one more time...
PUKE! And the after...
AHHH..

Friday I'll show you the process of making the island so watch for that.


Signature

Pin It!

2.28.2012

{Sewing Tip Tuesday} #4

Time for another sewing tip!
Shout if you are excited! Ok, I can't hear you shouting, but I'll pretend you are excited alrighty?


Here's a tip for anyone that uses zippers. I use tons and tons of zippers. I buy them in bulk because I use so many! If you use zippers as much as I do you might know this trick, if not, hope this helps you should you need to use a zipper.

Ok we are going to shorten a zipper in under a minute using your sewing machine. Ready??

First put your machine on a zigzag stitch....I use the number 4 stitch you see here...

Then set your stitch length to 0.0 so your needle does NOT advance. And your stitch width to 5.0.

Put your zipper under your needle and lower the needle down just on the right edge of the teeth. Does that make sense?

Then stitch a handful of times, like maybe 8 or 9.  Cut off the end you don't need. And that's it!

Now you can shorten a zipper with your machine in under a minute! Congrats! Super duper easy!

On a side note, I'm so glad I can write all this and not have to speak it to anyone...I have a froggy voice. Boo. I'm not sick, at least I don't feel sick. But I sure do have a hoarse voice. I've had a terrible sore throat for the last 4 days...no congestion...no headaches...don't feel bad...just raging pain in my throat...UGH!!! Hopefully it will either manifest into some cold I can attack with mucinex or GO AWAY!! Wish me luck!

OH, and today is my sister's 28th birthday AND my parent's 36th wedding anniversary. So Happy Birthday to my sis! And Happy Anniversary to my parents {I know mom will see this at some point}


Signature

Pin It!

2.27.2012

Dollar Store Cake Stand


Do you have a Dollar Tree where you live? I'm in love with mine. They have so many great things for a whopping buck! And they are always changing their stock so it pays to visit there often. If you've never been, go, run, get yourself inside one!

I've seen a bazillion DIY cake stand/cupcake stand/jewelry stand/whatever you want to call them all over the web, so this idea is definitely not original. But, I wanted to make one anyway.

I found this glass at my local Dollar Tree...

 and this plate...

{on a side note....I'm not sure why those 2 pictures suck so much. Maybe because I took them at night. Maybe because I took them 2 months ago. Maybe I never looked at them before today. Oops, my apologies}

Back to the project here...what do you do with these 2 things? Glue them together with E6000 glue. Let them dry overnight. Prime and paint.


I already had the glue and paint so I just paid for the plate and glass. Not bad for a $2 craft eh?

I've been kinda addicted to have a centerpiece on my kitchen island. Mr. Perfect isn't as thrilled because it usually involves some kind of sugary treat and let's face it...men have no self control...he can't walk by it and not eat something. 


Signature

Pin It!

2.23.2012

{How Pinteresting} #2

Welcome, Welcome
Time for week 2!


The lovely inspiration for the week...
Pinterest via Honestly WTF
So pretty.

If you read this tutorial, it says to use waxed linen cord??? Ok maybe I'm a tard, but I don't know what that is or where to get it....probably Hobby Lobby but I don't feel good so I improvised with what is in my house. No shopping for me.

I used:
*leather cord
*embroidery floss
*a hex nut {I couldn't decide which one to use, but I went with the smaller one}
*silver ball chain


And here's mine!


I think I finished mine off a little differently, oh well, who cares. And I gotta tell ya, I really wanted one that was pretty long that I could wrap around my wrist multiple times, like 5, but making one of these is super duper tedious and I got bored with it. tehe  Plus, this is all I could complete in one episode of the Bachelor. Do you watch that show? Do you despise Courtney like everyone else? I do. She's fake and I totally hate how she bites her lip all the time and talks like a baby. Oh Ben, I sure hope your brain kicks in soon...


Signature

Pin It!

2.21.2012

{Sewing Tip Tuesday} #4

Another week, another tip!


This week I have a tip from Sew4Home. I haven't tried this out specifically, but I have done something very similar that I will tell you about.

When sewing with vinyl or leather or faux leather you are supposed to use a teflon foot on your machine to prevent the fabric from sticking. But lets get real here people, are you going to buy a special foot to use on a fabric you probably rarely sew with?? Yeah, I thought not. I've seen people put tape on the bottom of their regular presser foot to glide over the material easier. I tried this once. It didn't work out so great. My tape kept getting pulled off. It just wasn't as easy as I thought it would be. It might work for you, but it didn't for me. Maybe I used the wrong tape, I don't know. So anyway, here's another alternative...


source
...add some wax paper to your material and sew away!

So like I said, I haven't done this specifically, but I have done something similar. I used tissue paper. Worked beautifully!

When you are done, just tear the paper away :)


Signature

Pin It!

2.16.2012

{How Pinteresting} #1

NEW SERIES!!!! WOOT!!


I'm so excited about this because I think it will make me feel more productive. Now I won't have this amazing board of "To Do" projects, but an UH-MAZING collection of DONE projects :)

source

So first week....here's the pin I decided to make.

source
That image is super small. Wow. Sorry. This is as big as I can make it. Look at the source I pulled this from to see it bigger.

Anyway, isn't it awesome?!? A basket made from paper sacks. So cute!

I don't exactly have a million paper sacks laying around, so I used a lawn bag. Probably a better idea to use a lawn bag anyway because they are double layered and I feel it made my basket SUPER sturdy.

I'm not going to show you all the steps I took since the inspiration picture explains it pretty well. But I will tell you that I modified it a bit. I only did 3 rows instead of 4. I also didn't use all those paper clips to hold my rows in place...it was seriously difficult for me. I wanted a tightly woven basket, so I just hot glued where I felt it needed it. 


Bottom side
 The inspiration picture doesn't have measurements for how long the strips need to be, which is a total bummer. Mine ended up being a little too short to fold over and tuck in another row. But it worked out, I just glued an extra strip along the inside rim to hide the ends where I folded them down! Worked like a charm! And it seems to have given an extra wee bit of strength at the top. Win!

Mr Perfect says "Hey, that's a pretty nice looking basket". I'm like, "For reals!" Then he says (in a voice that sounded excited, sorta) "Where you gonna put it?" ....he anxiously waits... Me, "I don't know" ....crickets....
I think he was a little disappointed I didn't have some magical answer haha
After he left the room I looked over at the pitiful side table and saw all the remotes everywhere. Light bulb! So my cute little lawn bag basket is now serving as a remote corral. That table was screaming for some attention....it's very sad.


I'm going to give this project a B. I love how cute it is. I love that it's recycled. I love that it's super sturdy and not floppy. I don't like having to guess measurements on something and then have it not work exactly the way it should.

As an added bonus, I still have the other half of my lawn bag, so I just might make another one!

You can check out all my pins on Pinterest.  Any recommendations on what you want to see me do for next week??


Signature

Visit thecsiproject.com

Pin It!
Related Posts Plugin for WordPress, Blogger...