7.29.2011

Pinterest Picks {Week 1}

I've decided that each week I will be posting a few things I've pinned.
I just signed up on Pinterest last week and I'm hooked like a crack addict!
{And I've gotten a few of my friends hooked too *tehe*}


Everything today is coming from my Love for all things PEACOCK board!!


This fall my sister and I are considering getting a "sister tattoo"
She currently has 4
I have none
I want a peacock feather
But it's still up in the air
I'm a wuss

Much Love~
Meredith

Pin It!

7.27.2011

Friendship Bracelet Swap!

I just saw this today and it makes me all warm and fuzzy inside


It's sponsored by The Modern Marigold

I got signed up just before the deadline
TODAY is the last day peeps!

Go sign up!
It's fun to make something for someone random, and meet a couple new friends

Like pen pals, with benefits *wink*

Much Love~
Meredith

Pin It!

7.26.2011

Lanyard/Keychain Thing-a-ma-boppers

In case you missed it, I did a guest post on Sunday over at
Tattered and Inked
So I'm going to re-post it :)
Enjoy!


Today I am going to share a tutorial with you on how to make a lanyard/key chain.
I am a school photographer and I have to wear a name tag to work every day.
Lanyards are usually soooo boring, so I make my own!

So here's how I started

First I cut a strip of fabric 2 inches wide and 35 inches long {cut selvage to selvage}

Next iron the strip the strip lengthwise wrong sides together
Open it up and iron each side to meet the middle fold
Then fold it back in half and press flat
Please ignore how gross and stained my ironing board is, thank you!
 Then just sew straight down each side
Make sure you backstitch at both ends
I started with the open side to kinda put the fabric place so it doesn't slide around
I lined my edge up with that little metal piece under my presser foot...you see it?
I hope your machine has one too...if not, it's about 1/8 of an inch

Almost done!
Match up your ends and fold about an inch upwards
I held mine in place with a binder clip :)

I changed my needle to a size 16 for the next part because you are sewing through 16 layers of fabric!!
So just sew 2 lines right across where the ends are
Then slide on a split ring and you're finished!!

 Because you cut selvage to selvage your fabric shouldn't fray as easily, but just to make sure, I put a couple drops of Fray Check on those ends :)


And of course I have to show off my 2 pieces of flair! My District 12 button from Hunger Games! If you haven't read this trilogy, RUN, don't walk, RUN to your bookstore and read them ASAP!! And I have my Get Crafty button *wink*
So there you have it! If you can sew a straight line and iron, you're golden! 
These are super popular with teenagers too!
They love putting them on their keys...I see it all the time
Or you can shorten the length for a keychain for yourself :)

I hope you all enjoyed my little tut!

Much Love~
Meredith

Pin It!

7.24.2011

Guest Posting!!!

That's right people....today I am guest posting for Kelsey at


Tattered and Inked

EEEK!!!!
I'm so thrilled!!

I'm doing a super easy, quick, versatile, fun tutorial over on her blog
Here's a sneak peak of the fabric I'm using :)


Isn't it lovely??
So if you want to see what I made with this, head over to Tattered and Inked and check it out!
And give Kelsey some blog lovin while you're there, she's adorable!

Hope you are having a fantastic weekend!!

Much Love~
Meredith

Pin It!

7.23.2011

To Pinterest, or Not To Pinterest??


{DUH}

I joined the tons of people who spend hours and hours mindlessly "pinning" every image they see online that strikes their fancy.

I'm totally ok with it too.

So follow me!!
You can find the button in my sidebar
I think I'm going to start a series, on Fridays, where I showcase some of my pins
Whatcha think? Yay? Nay? ....please say yay!
Excuse me while I go back to  searching for eye candy online :)

Much Love~
Meredith

Pin It!

7.20.2011

The Bachelorette and a Monogram

Ok so this post isn't really about The Bachelorette....although I just love the romantic mess on that show....
I was just watching it while I was doing this craft
Here's what I'm workin with

Slap some Mod Podge on that bad boy and stick on some moss

I had planned to put moss on the edges too, but I got lazy so I just painted them this green color. In hindsight, the painting should have been done first. Oh well.

And that's pretty much it! I put it on my mantle.

I had intentions of hanging it from that mirror, but 
A) I don't like any of the ribbon I have right now, and
B) This was easier :)

And yes, that's a speaker on the left side....and blankets on the bottom ledge...
This is real life people...not a model home.

That's it!
Now I'm off for a nap....anyone else just super exhausted???

Much Love~
Meredith

Pin It!

7.18.2011

Circle Of Life

I have to share what violent action I saw out my window yesterday
Out of nowhere this hawk lands in my driveway and crushes the life out of this bird
Just stomping on the thing
It was gross and sad and yet oddly fascinating
It lasted about a minute, then the hawk flew the bird to my neighbor's chimney cap where it continued killing it's lunch
Good thing I keep my camera handy and ready at all times :)

There ya have it folks...the circle of life

Much Love~
Meredith

Pin It!

Clothes I've Made/Refashioned

Since I blogged about the outfit I refashioned yesterday, I thought it would be a good idea to show you some of the clothes I've made myself or refashioned in my pre-blogging days. Mmmkay?

Let's not get upset about the pictures...some might be slightly blurry...my mistake

Ok, first up, this tube top I knitted! It's the only clothing I've ever knitted for myself. It's super tiny knit too, and let me tell you, it took me like 2 months to make this thing!


I refashioned this tank. I had an old tank with a logo on it from a bar I used to work at that I wanted to cover up. I used another tshirt to cut up strips and sew them on in a ruffly sort of way to cover up the logo.
The skirt I made. It's a basic elastic wasted skirt....can you see the black elastic??
I actually wore this outfit to my 10 yr high school reunion last year.

 This skirt is basically the same as the previous one, except this one has a liner too. I should mention both of these fabrics for the skirts are vintage from a garage sale...awesome find right!?!
The shirt was a basic long sleeved white shirt that the sleeves had shrunk on. I cut the sleeves off, then used the fabric to made little snap up ties on the sleeves and the ruffles on the front.

This is the very first thing I sewed on my sewing machine. It's vintage fabric from that same garage sale. I used a pattern to make this shirt {only clothing I've ever used a pattern for}. It was definitely a learning experience. I think I called my mom used google about 50 times just to decipher the pattern! And it was supposed to be a dress, but I made it a shirt instead. I was pretty impressed with myself in the beginning because there's a fancy invisible zipper in the back....yeah...it's not invisible. Over a year later, I now know the proper way to install one :)

So there you have it.
Whatcha think?

Much Love~
Meredith

Pin It!

7.17.2011

A Turkish Feature

So I noticed that I was featured by someone in Turkey...
It's driven a lot of traffic to my site and for that I'm grateful!
But, I don't know how to thank this woman...
I can't read a word on her site!
I can't even read what she wrote about me!
I tried to enter the little paragraph in a translator, but what came up didn't make very much sense.
HELP!
What do I do?
How can I read a blog by someone in a different language???
I'm at a loss...

Here's the link if you want to see.
Scroll down to her second post.
You'll recognize my Braided Bracelet

Please help~
Meredith

Pin It!

Sunday Refashions

I'll start off by telling you what I wanted to do with my Sunday...

I wanted to be basking in the 100 degree weather next to one of these
(source)
And this is totally the pool I would be going to...cuz that's how I roll 

I also wanted some of this
(source)
Because today is National Ice Cream Day!!!

BUT...

Neither of these wonderful things happened today
Why?
Because the kiddo got in trouble
Boo

So now I'm stuck inside being pale and healthy.
AND sewing!!

I have 2 refashions for you today...
First off, I have this dress that I NEVER wear. 
I love it, it's super cute, but my rib cage is too big for the top.
Solution...cut it off and make a skirt instead.
Here's what I started with

Look how great that detail is!
If only I could breathe with it on as a dress!

Ok, so here's the second item I refashioned....

I have this shirt that I HATE
It's orange...gross
It's boxy...blah
It's all around U.G.L.Y.
I don't even know why I bought this shirt so many years ago
I'm sure I've never worn it

See what I mean? Not cute at all!

I made this a little more form fitting and cut the sleeves off
Here it is after the transformation
Loads better, but still boring
So I used the scrap fabric from the sleeves and dressed it up a bit
Here's the whole outfit finished
{ignore my blurry photos...that's what happens when you are trying to photograph yourself}
{and I cut my head off because my hair looks like poo today and I have no makeup on}


There's no question I love the skirt!

The real surprise here is that I now ADORE this shirt!!!
I think I might just wear it everyday...I'm only kidding...sort of
And it looks fab with this skirt!

So there you have it
If I can't have the pool and ice cream, I can at least refashion myself a new outfit!

Hope you are doing something fun today!

Much Love~
Meredith

Pin It!

7.14.2011

Handmade Gift Exchange

Twice a year at Craftaholics Anonymous Linda hosts a Handmade Gift Exchange.
Sign up and receive contact info for a partner.
You then have 1 month to get to know that person and make them a lovely gift!
It's such a great idea!

My partner was a lovely woman name Heidi.
Heidi loves pink!
So here is what I made her...she *hearts* it!


The gift exchange went on during the month of June. 
Unfortunately the postal system sucks seems to have lost my package from Heidi, so I have yet to receive anything from her.
Every day I walk to my mailbox with such anticipation, but to no avail.
That's ok though! If nothing shows up, I still had a great time making something for a total stranger!
Gave me the warm fuzzies inside *giggle*
I have been waiting to post what I made her until I got my gift, but I just can't wait anymore.
I had to share!

From what I understand (since I'm new at this stuff) the next exchange will be in November.
I highly recommend looking out for it and joining!

Much Love~
Meredith

Pin It!

7.13.2011

Purse/Coat Hooks

My entryway is kind of an eyesore.
I don't even have a real rug inside my door...it's a carpet remnant...super classy I know!

Anywho, I needed somewhere to hang my purse when I come in the door
And I suppose it would be nice for my guests to have somewhere to hang stuff too

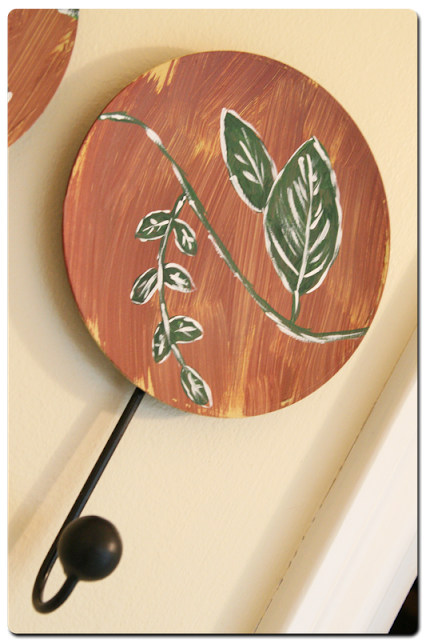
I saw these at Hobby Lobby for a whoppin $1.40 a piece
Woot! Score!

 But really, who needs 4 hooks that have crowns on them?? Yeah, not this girl! 
So I painted them :)
 And here they are!
Yes I realize the one my purse is hanging on is a wee bit wonky, but I promise I hung them level...I think the bracket on the back is off...but that's what you get for $1.40 right? Oh well, good enough


Cute enough I think :)
I'm certainly not the best painter in the world mmmkay

Much Love~
Meredith

Pin It!

7.11.2011

Braided T-shirt Bracelet

This was a super quick project that I whipped up before work the other morning.
It's so easy to do that I'd recommend making, oh, about 153 of them!
So here's whatcha do
Start with an old knit shirt of some kind. I had already cut the sleeves off this for something else.
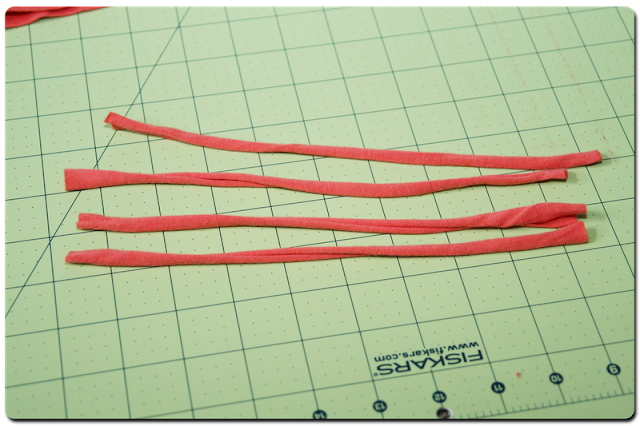
 I cut 4 strips that were an inch wide and 8 inches long. I measured my wrist to be 6 inches around then added a couple inches that I thought I would lose in the braiding process. After you cut them, pull the ends to stretch them out. I should mention that this won't work very well unless you cut your fabric the right way, so tug and pull on your shirt beforehand to figure out which way to cut.
 Since I'm all about doing things the easy way, I just hot glued the strips together at the end
 Use a binder clip {or whatever clip you want} and clip to a book {in this case, Mr.'s accounting textbook} and start braiding!
 When you are done, hot glue the other ends together
 Fold together and , yeppers, you guessed it...hot glue the 2 ends together
 Cut another strip about 2.5 inches wide and 4 or so inches long, then fold over the sides to make a tube
 Glue on the inside of the bracelet when your ends meet, wrap it around and glue to finish!
 And voila! A super cute, super comfy, super quick bracelet for summer!

Now go cut up all your old knits and get to braidin'!

Much Love~
Meredith

Pin It!
Related Posts Plugin for WordPress, Blogger...